Creating great push campaigns is not an easy task. Take a moment to think about the last couple of notifications you have received. How many of them made you want to click and learn more about them?
That’s what we thought.
Now that you’re on the other side of the advertising ecosystem, you know how hard it is to create a great push campaign that is both profitable and scalable.
We went through the struggle of creating great campaigns, just like everyone else in the industry. And we’ve learned a thing or two along the way, so we decided to share them with you to shorten your learning process.
Keep on reading to learn how to create profitable push campaigns that you can scale.
Let’s start with the basics.
What is Push Traffic and How Does It Work?
Push traffic comes from push notifications – yes, it is that simple. Back in 2018, it was one of the most popular ad formats, and that’s when the opportunities got big for everyone! A new fresh advertising channel for marketers ready to convert with minimal budgeting.
Users decide whether to accept web push notification when they visit specific websites. After that, they keep receiving notifications that can be turned into ads or just regular notifications from the website itself within the browser.
Users can always decide to unsubscribe and not to get notifications at all.
You have likely encountered a prompt that appears frequently and reads:
“www.websitename.com” wants to: Send Notifications
And you get to choose between two options: Allow or Block

If the user clicks Allow, they will start receiving notifications from www.websitename.com. Users can begin receiving push notifications only when they have consented to receive them.
So, if they click Block, they will not receive any notifications from that website.
Push alerts typically resemble the following:

When a user clicks on the ad, they land on the landing page of the advertiser’s product or store or directly on an advertiser’s page.
Now you are familiar with the origin of push ads and the way they work, so we can continue to the part we know you’re here for – learning how to create winning campaigns by using programmatic advertising to purchase push traffic.
What is Programmatic Advertising?
Programmatic advertising is the use to the use of algorhytmic software to buy and sell digital advertising space.
Unlike the traditional method, which includes a lot of requests for proposals, quotes, and negotiation, programmatic buying automatizes the process completely.
Programmatic advertising is effective because there is no need for any manual adjustments – the algorithm takes care of the whole process.
When an advertiser wants to promote their offers through a digital ad campaign, most often, they turn to a DSP. Most of them come with the feature of programmatic advertising, so the purchase of ad space for a specific campaign is automated – the system finds and targets the appropriate audience based on location, demographics, user behavior, and online activity.
Besides that, programmatic advertising makes it easy to scale campaigns. Advertisers can reach a wider audience by purchasing ad space at various ad inventories without manually figuring out if the audience is the right one.
Due to the precise targeting that programmatic advertising provides, less campaign budget goes to waste on testing. Users receive more relevant ads and as a consequence, the conversions are higher.
Using a DSP is the simplest approach to purchase traffic through programmatic advertising (demand-side platform), and it is a cost-effective investment for advertisers.
A quick trivia bit:
Global spending for programmatic advertising has surpassed $150 billion in 2021. The biggest spender is, of course, the US, followed by the UK and China.
So, You WANT Traffic?
You are reading this, so we know you do. And we have it. Coinis DSP gives you a wide reach to the audience and quality in-house traffic. These are the main reasons advertisers choose our network.
DSP or Demand-side platform is a programmatic advertising platform where ad buyers can purchase and manage ad inventories from different ad sources.
Besides that, we have simplified the services, flow of use, costs, support that you can get, etc.
On our DSP, you can choose between two ad formats – Push notifications and Contextual ads.
You have advanced targeting options so you can choose your audience based on GEO location, operating system, browsers, user freshness (target users by hours or by days), day and time, IP and ISPs, and device manufacturers/types.
Push campaigns on Coinis DSP
Testing is the most important thing in this industry, and DSP is there to save you a lot of time that you’d usually spend on testing through the automated process of media buying with a real-time bidding system.
You come, create a campaign, set the bid, and get in the pool with all other advertisers who are fighting for the same traffic.
How to choose the right audience?
We’ve covered the basics of targeting above, but it would be a pity not to explore in detail all that DSP can offer in terms of it.
Targeting and finding the “perfect” audience can be pretty tough and exhausting. However, you can get close to it through detailed targeting that is available on a DSP.
Targeting users by OS and device type
For example, if you are promoting a mobile app, you are obviously going to target mobile phones + operating systems used on mobile phones, such as Android.
On the other hand, if you are promoting an extension, you are probably going to target only desktop users + operating systems used on desktop devices, such as Windows, macOS, or Linux.

It mostly depends on the type of the offer and which OS and device type will work better. There are some offers out there that might work equally well for both desktop and mobile traffic.
Once you have decided which device type you will target, you can choose operating systems according to that.
For example, in this exact example, we are promoting an Android mobile application, which works only on newer Android devices:
So, in this exact case, we have included: Android 10, Android 11, Android 12
Browsers
In most cases, browser targeting can be a pretty important thing to target properly. Even though it may seem that users will behave on every browser the same, that usually isn’t the case.
Users subscribed to push notifications from some browsers may convert better than users subscribed from other browsers. From our experience with desktop traffic, it has been shown that users who subscribed for notifications from the Microsoft Edge browser convert better than users that came from some other browser.
But, in our specific case, we are targeting Android users, and Microsoft Edge does not exist for Android phones.

So, in our case, we are going to target Google Chrome users.
User freshness
For the beginning, let’s clarify what user freshness represents.
User freshness represents the time since the user opted to get push notifications. So, if the user opted in 7 days ago to get our push notifications, he will be in the 0-10 days user freshness group.
How to decide what to target?
If you’re running some offers with a more complicated flow and need a fresher user, it is highly advisable to target “fresher” user groups. If you are unsure which user freshness to choose, the best thing is to do the test!
So, if you are running one campaign for one product, make three different campaigns. That’s how you’ll see which user freshness will fit your product the best.
For example, you can target:
- 0-1 hour users
- 0-3 days users
- 3-10 users
This way, you will see and understand which of these work best for your product and which CPC suits you. Recommended CPCs are changing depending on the user freshness group you choose.
The most common user freshness targeting for the beginning is 0-3 days. So, in our case, we are going to start with that.

As you can see, there is an option to target users by hours. It is highly recommended to do it, but only once you get to know a real audience. Once you are sure about which device type to target, which is, and which geo, you can start “playing” with different user freshness groups.
Day & Time
Let’s say you are promoting an offer for which people are only interested during workdays for some reason. For example, it is an application that helps them be more focused while working. It’s a much bigger chance that people will be more interested in this application while they are at work.
So, in this case, let’s target those users.

Making a whitelist and blacklist
WL and BL – account manager:
Starting with blacklists and whitelists can be a pretty good thing if you have an account manager.
Especially if your account manager has a whitelist for the vertical, you are running.
But you have to be cautious with that. You might be missing some good sources by limiting yourself only to the sources your account manager has told you are good.
If you reach a limit with sources you whitelisted, you should try making a campaign without a whitelist so that you can potentially explore some new sources that will work well for you.
On the other hand, a blacklist is always highly recommended and welcomed, especially if the account manager tells you which sources to exclude -> account manager usually knows his traffic.
WL and BL – making them by yourself
So, if you do not have an account manager, or you have, but the WL that the account manager has given you does not work, you should try creating your own WL and BL.
A whitelist is always something that is going to take more time to create than a blacklist. Every source that is not profitable for you should be blacklisted. How?
For example, the payout for the offer you are running is $5. Every source that spends more than $5 should be automatically blacklisted in current and in every next campaign you create.
On the other hand, creating a whitelist can be more tiring because you will need more sources to make a successful campaign. It doesn’t make sense to create a whitelist campaign with 1 or 2 sources that have a low number of impressions on a daily basis.
But, this doesn’t have to be the rule. There are always exceptions where 1 source can have large volumes of traffic OR is converting crazy good. Here, it’s profitable for you to create a campaign with only one source.
Budget & Bids
So, let’s start with bids. The bid is mostly going to depend on the targeting you have chosen. Browser, OS, device type and user freshness are going to affect your bid.

In our specific case, a bid the platform recommends is $0.091. So 9 cents per each click since Coinis DSP is on a CPC basis.
We will put $0.11 to ensure that we will get slightly more traffic on average.

But, let’s understand how we got this recommended bid.
So, your bid depends on the device type, OS, and user freshness you are targeting.
Desktop users’ clicks are more expensive than mobile users’ clicks. Edge users’ click is more expensive than Chrome users’ click. IOS users’ click is more expensive than Android users’ click.
Basically, like in life, it’s the play of demand and supply. If we have more of something than we need, it’s going to depreciate in price. So, we have way fewer Edge users than Chrome users, + they are better at converting. As a result, we get that Edge users’ click is more expensive than Chrome users’ click.
It’s the same thing with user freshness.
The “fresher” the user, the bigger the competition. Everybody wants to get the freshest users, which means that demand is pretty high.
Higher demand means higher prices.
As a most targeted user-freshness group, let’s take 0-3 days as a referral point. Those users are pretty solid and relatively fresh.
Let’s say the bid for this group is $1. If you want to target fresher users, you should definitely put a higher bid.
Let’s split fresher users into 3 categories:
- 0-1 hour
- 1-6 hours
- 6-12 hours
If you target users 13-24hours “old”, you should multiply a bid for 0-3days users by 1.2. So, you will get $1*1.2 = $1.2.
If you target users 2-12hours “old”, you should multiply a bid for 0-3days users by 1.3. So, you will get $1*1.3 = $1.3.
If you target users 0-1hour “old”, you should multiply a bid for 0-3days users by 1.5. So, you will get $1*1.5 = $1.5.
So, in our case, here is how the bids would look:
- 0-1 hour: $0.165
- 1-12 hours: $0.143
- 13-24 hours: $0.132
Now that you have determined a bid you want to go with, be sure to put a daily cap on your campaign so that it doesn’t go crazy with spending.
A daily cap is a must, especially if you are not in the situation to monitor the campaign constantly.
Always start small and then scale.
Last but not least – Creatives!
We are almost done with creating a campaign, but we have the last step to do: creating/generating creatives.
Even though we have left them as the last step, they are nowhere less important than anything we have previously mentioned about creating campaigns.
They can be an essential part of your campaign. Why? Well, the first thing a user encounters is the creative. It is a hook that will make them click on your ad and “heat them up” for what comes next.
If you’re buying your push traffic on CPC, it might seem unimportant to “play” with creatives because you are only paying for clicks, and you’re not losing money if someone is seeing it and not clicking. Moreover, remember that most platforms that work on a CPC basis calculate the eCPM of the campaign and distribute traffic according to that.
What is eCPM?
To explain what eCPM is, let’s first explain what click-through rate (CTR) is. CTR is a ratio showing how often people who see your ad end up clicking it.
If your ad is seen 1000 times and you get 100 clicks, your CTR is 10%.
So, eCPM is a metric that combines two things – CTR(click-through rate) and bid. Let’s explain this through a practical example.
If your bid is $0.5, and you get only 10 clicks per 1000 impressions (0.01% CTR), your eCPM is going to be $5.
If there is another advertiser bidding $0.3, you would probably expect that you will get more traffic because of the higher bid. But, other advertisers’ creatives earned him 50 clicks on 1000 impressions, which means that that advertiser has a higher CTR – 0.05%. That further means his eCPM is $15.
In this case, this other advertiser is going to get much more traffic than you.
So, the moral of the story is to create more creatives that are appealing to the end user and will make him click on them.
Our recommendation is to always start with a minimum of 3 different creatives. This way, you can see which of the 3 creatives has the highest CTR and proceed with the selected creative.
3 creatives are the minimum number of creatives you should start with, but it would be good if you could always go with as many creatives as you can (depending on the number of creatives allowed per platform).
Many platforms have their regulations regarding creatives, but Coinis Advertising Platform allows you to create up to 15 different creatives. The best thing is that you can create up to 15 creatives in no time, thanks to our creatives generator, which mixes headlines with images.
If you put 2 titles and 3 different images, the creatives generator will generate 6 different creatives for you in this way:
- Title 1 – Image 1
- Title 1 – Image 2
- Title 1 – Image 3
- Title 2 – Image 1
- Title 2 – Image 2
- Title 2- Image 3
Let me show you an illustrated example of this:
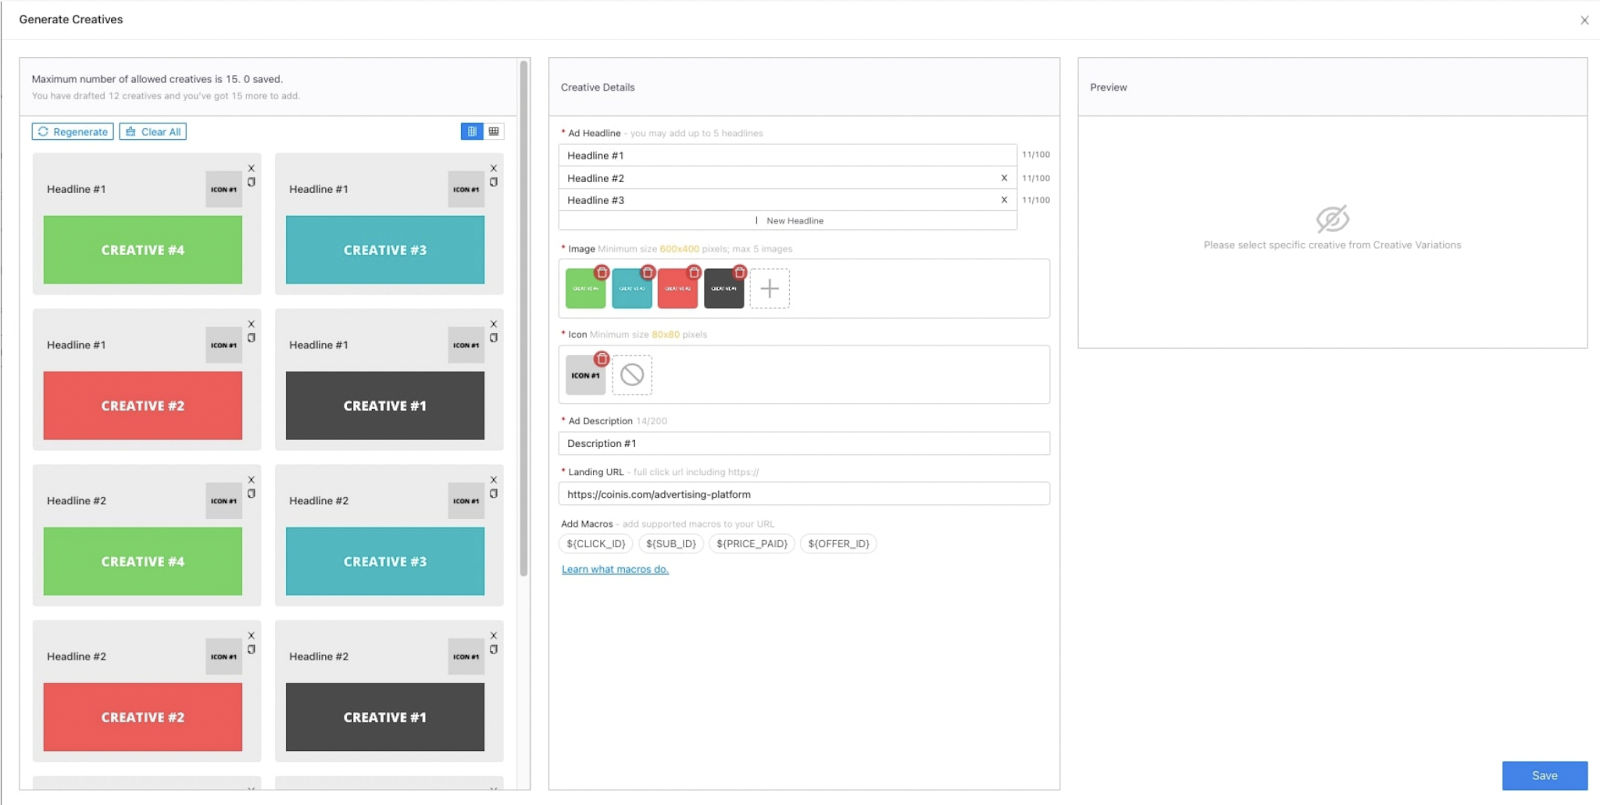
As you can see here, I’ve added 3 headlines and 4 images, and I’ve automatically generated 12 creatives.

Here we can see a list of all creatives.
So, to conclude the story of creatives, let’s just say that it is really important to create more of them. That’s how you can find the best working creatives and raise your CTR, which will help you in scaling up your campaign.
Okay, so now we have learned how to create our winning push campaigns, and the time has come to optimize it.
Creating might seem like an easy job for you, but optimizing your campaign is the real deal.
Optimization
Since optimization is a theme for a whole new blog and thread, so we will mention only optimization basics here.
First, to make optimization an easier job, we recommend that you always make one campaign per one GEO – one browser – one device type.
That would mean that you should create six campaigns if you want to run one offer in three countries and two different types of browsers.
That is not only because of optimization but also because of the bids. The bid for each of these GEOs (and browsers) is different.
This way, you have a way better look at your campaigns.
Source optimization
If you’ve set up your campaigns this way, the first thing you should look at when optimizing is sources.
So, when running your campaigns on an advertising platform, you will probably have many different sources from where your traffic is coming from.
You should sort them in descending order by spending and see the sources that spent the most money. You will most likely have a couple of top spending sources, which you should optimize.
But how?
If any of the sources have spent more money than you are earning from one conversion, that source should be excluded from your campaign.
If this happens with one source in more campaigns (it spends money but is not profitable), you should exclude it globally from all current and future campaigns.
Creatives
After you’re done optimizing sources, it is time to check creatives. If you’ve made more creatives, as we advised you to do, you should go and see which of the creatives had the best CTR. The creative with the best CTR should be a creative you will keep going with, while you should delete (or pause) all other creatives.
Day & Time
If you see that you get more clicks and conversions during working hours in working days, you should run your campaign only during those periods.
Most platforms can schedule a campaign and make it run on certain days, while it will stay paused on the other ones.

It should look something like this.
Browser, OS
If you’ve made a campaign as we advised you to do, so one campaign per browser and OS, you shouldn’t have a problem with this. But if you mixed them all up in one campaign, then you should also check the results per browser and per OS. This is how you check which browser or OS converts better, and stop the ones that are not converting well.
Impressions
If you see that you are getting a small number of impressions daily, you should raise the bid. But, if the bid is high enough, and you still keep getting a low number of impressions, then the problem is probably low eCPM. That means you should work on optimizing creatives to find ones that work better.
Still have questions about push campaigns?
Or anything else for that matter: Feel free to contact us regarding any topic you would like to read about. Our nerds experts are happy to share their knowledge and provide enough information for you to scale.
For more information about the advertising platform, head to the section dedicated to our advertisers.
If on the other hand, you are a publisher – there is room for you, too, since you can take this format and place it on your website directly!
Register today and get the most out of your traffics worth!

Tamara Jelic
Author
Part-time researcher, part-time marketing enthusiast. Wanted to be a teacher, ended up working for the best ad tech company in Eastern Europe.